This comprehensive guide reveals how to achieve genuine 100/100 Google PageSpeed scores on WordPress through proper LiteSpeed Cache configuration – specifically advanced features most users never enable: Redis Object Cache, Guest Mode caching, database optimization, and intelligent image handling. The difference between “installed LiteSpeed Cache” and “properly configured LiteSpeed Cache” often separates 3-second load times from sub-1-second performance.

wordpress pagespeed optimization is critical for your site’s success. Your wordpress pagespeed score matters: your site loads in 3 seconds. Feels acceptable, right? Wrong. According to Google research, 53% of mobile visitors abandon sites that take longer than 3 seconds to load. Every second of delay costs you half your potential customers — fixing your wordpress pagespeed is essential. Meanwhile, competitors with better wordpress pagespeed scores capture the traffic you’re losing.
The wordpress pagespeed frustrating reality? Most WordPress owners install LiteSpeed Cache plugin, see minimal improvement, and assume they need expensive premium plugins like WP Rocket ($49-249/year) or paid CDN services. They don’t realize LiteSpeed Cache’s default settings barely scratch the surface of available optimizations.
This comprehensive wordpress pagespeed guide reveals how to achieve genuine 100/100 Google PageSpeed scores through proper LiteSpeed Cache configuration – specifically the advanced features most users never enable: Redis Object Cache, Guest Mode caching, database optimization, and intelligent image handling. These aren’t obscure tweaks requiring developer expertise. They’re built-in features waiting for activation.
The wordpress pagespeed difference between “installed LiteSpeed Cache” and “properly configured” often separates 3-second load times from sub-1-second performance. This isn’t theoretical – we’ll walk through exact settings, explain why each matters, and show measurable results.
By the end of this wordpress pagespeed guide, you’ll understand why default LiteSpeed Cache settings underperform, how to enable critical features most users miss, and why LiteSpeed Enterprise on managed hosting delivers advantages impossible to replicate with Nginx or Apache alternatives requiring paid plugin stacks.
WordPress powers 43% of all websites globally but gains reputation for slowness. This isn’t WordPress’s fault – it’s how people configure it.
Installing WordPress with default settings creates performance bottlenecks:
No page caching: Every request generates page from scratch, executing PHP code, querying database, rendering HTML. Even if content hasn’t changed since last visit, WordPress repeats entire generation process.
No object caching: Database queries execute repeatedly for identical data. WordPress fetches same menu structure, widget content, and post metadata on every single page load instead of caching results in memory.
Unoptimized images: Photos uploaded directly from cameras contain 5-10MB files with metadata WordPress doesn’t need. These massive images slow page loads without providing better visual quality.
Render-blocking resources: CSS and JavaScript load synchronously, blocking page rendering until downloaded. Visitors stare at blank screens while browser downloads dozens of stylesheet and script files.
Database bloat: Post revisions, spam comments, transient options, and plugin data accumulate indefinitely. Database queries slow down as tables grow with unnecessary data.
Most wordpress pagespeed beginners install LiteSpeed Cache from WordPress repository, see some improvement, and stop. They’re using maybe 20% of available optimizations.
Default settings enable:
Default settings DON’T enable:
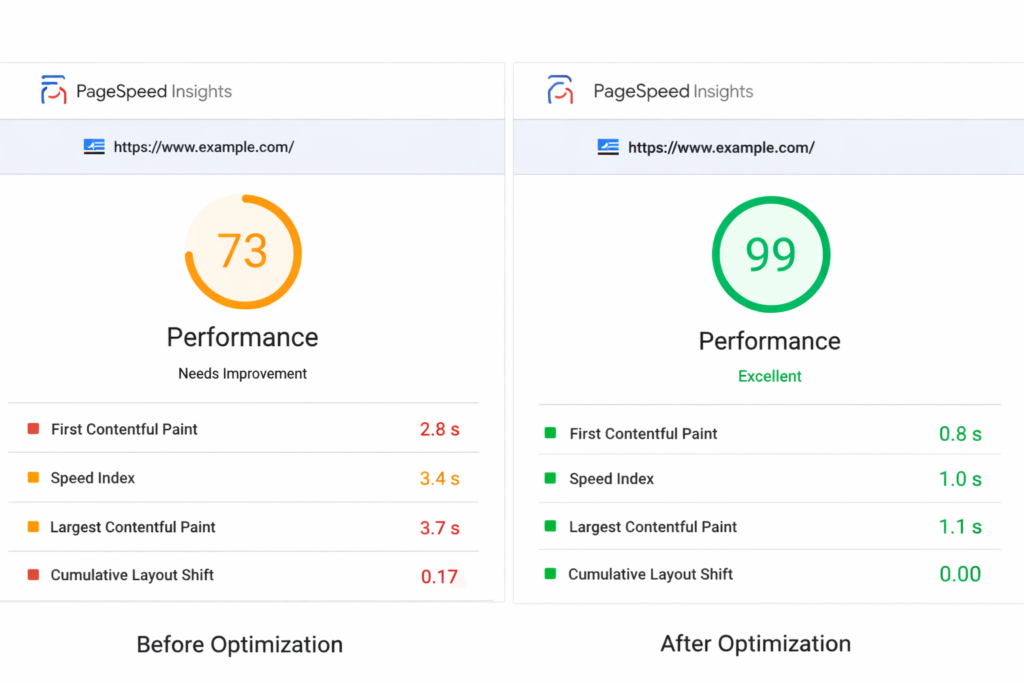
The wordpress pagespeed difference? Sites with default LiteSpeed Cache might achieve 70-80 PageSpeed scores. Properly configured LiteSpeed Cache regularly hits 95-100.
Without proper caching, WordPress owners install plugin stacks trying to fix performance:
Total cost: $100-300/year plus performance overhead from running 6+ optimization plugins simultaneously.
The irony: These plugins consume server resources while trying to optimize performance. Each plugin adds database queries, file reads, and PHP execution that partially negates optimization benefits.
LiteSpeed Cache isn’t just another wordpress pagespeed plugin. It’s direct integration between LiteSpeed web server and WordPress, enabling optimizations impossible with traditional Apache/Nginx setups.
Traditional caching plugins (WP Rocket, W3 Total Cache, WP Super Cache):
LiteSpeed Cache for wordpress pagespeed:
Performance impact: Traditional plugins require loading PHP and WordPress before checking cache. LiteSpeed Cache intercepts requests at web server level, serving cached content without invoking PHP at all.
Benchmark comparison:
This architectural difference explains why LiteSpeed Cache delivers better wordpress pagespeed results than premium alternatives even before optimization.
For wordpress pagespeed, LiteSpeed offers two versions: OpenLiteSpeed (free) and LiteSpeed Enterprise (commercial).
OpenLiteSpeed wordpress pagespeed limitations:
LiteSpeed Enterprise advantages:
Why this matters for WordPress: LiteSpeed Enterprise provides production-grade infrastructure with advanced caching features OpenLiteSpeed lacks. This is what managed hosting providers use.
Let’s configure LiteSpeed Cache properly. This setup delivers 80-90% of potential performance gains.
Installation:
Verification: After activation, check Dashboard → LiteSpeed Cache for green “Your site is running on LiteSpeed!” message.
If you see “not running on LiteSpeed”: Your hosting uses Apache/Nginx, not LiteSpeed. This guide’s optimizations won’t work – consider migrating to LiteSpeed hosting (see WebHostMost section).
LiteSpeed Cache includes setup wizard handling basic configuration:
Wizard configures:
Important: Wizard provides foundation. We’ll refine settings for maximum performance.
Navigate to LiteSpeed Cache → Cache tab.
Enable these settings:
Cache → Cache Tab:
Cache → TTL Tab (Time To Live):
Why these numbers? Public content (posts, pages) rarely changes, so 1-week cache is safe. Private content (user-specific) refreshes more frequently.
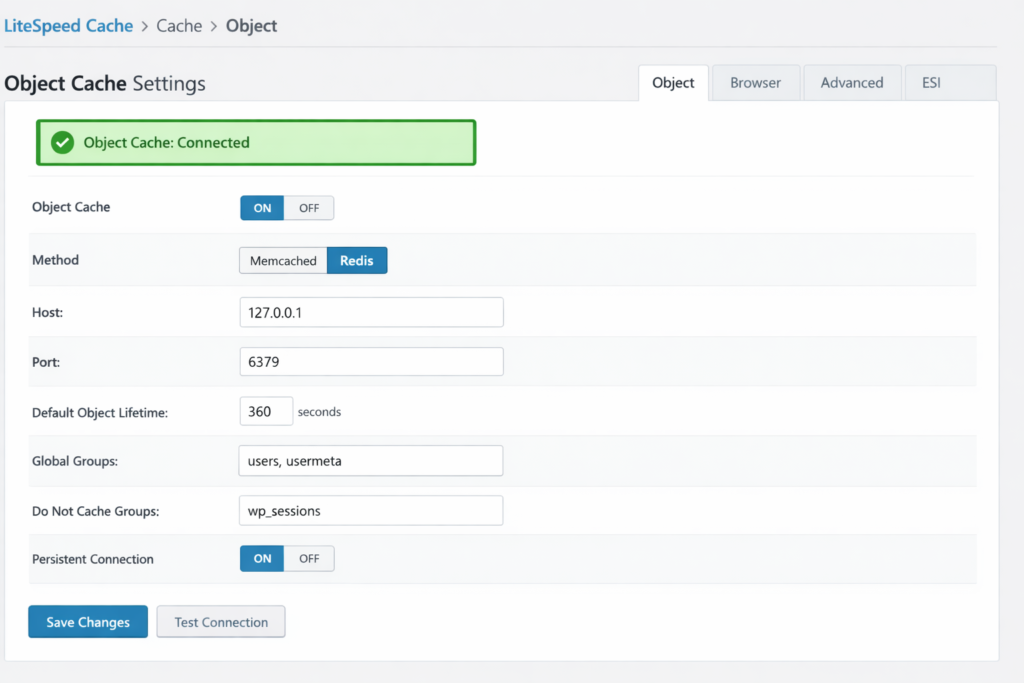
Object cache stores database query results in memory, dramatically reducing database load.
Requirements: Redis server (included in quality managed hosting)
Configuration:
Testing Redis connection: After enabling, check LiteSpeed Cache → Cache → Object for “Object Cache: Connected” status.
If Redis unavailable: Contact your hosting provider. Quality WordPress hosting includes Redis. If your host doesn’t offer it, this indicates subpar infrastructure – time to migrate.
Performance impact example:
Guest Mode treats logged-out visitors identically, enabling extremely aggressive caching.
Why Guest Mode matters:
When to use Guest Mode:
Configuration:
This creates two experiences:
WooCommerce consideration: Guest Mode works with WooCommerce by excluding cart/checkout pages from cache. We’ll cover this in WooCommerce-specific section.
Basic configuration achieves 85-90 PageSpeed scores. These advanced optimizations push to 95-100.
Images typically constitute 50-70% of page weight. Optimizing images provides largest performance gains.
WebP format provides 25-35% smaller file sizes than JPEG with equivalent quality. Modern browsers support WebP universally.
Configuration:
How it works:
Storage consideration: WebP conversion creates additional files. 1,000 images = 2,000 files (originals + WebP). Most hosting provides adequate storage, but monitor disk usage.
Lazy loading defers image loading until images enter viewport (visitor scrolls to them).
Configuration:
Why Viewport Images = 4? Above-the-fold content typically contains 2-6 images. Loading first 4 ensures visitors don’t see placeholders for immediately visible content.
Warning: Lazy loading can confuse some JavaScript libraries expecting images loaded. If elements break after enabling lazy loading, add affected image classes to exclusions.
LiteSpeed provides image optimization service compressing images without quality loss.
Configuration:
Quota: Free tier includes limited monthly optimization quota. Paid tiers available for high-image-volume sites.
Alternative: Use Smush or ShortPixel for optimization, then enable LiteSpeed Cache’s WebP conversion and lazy loading.
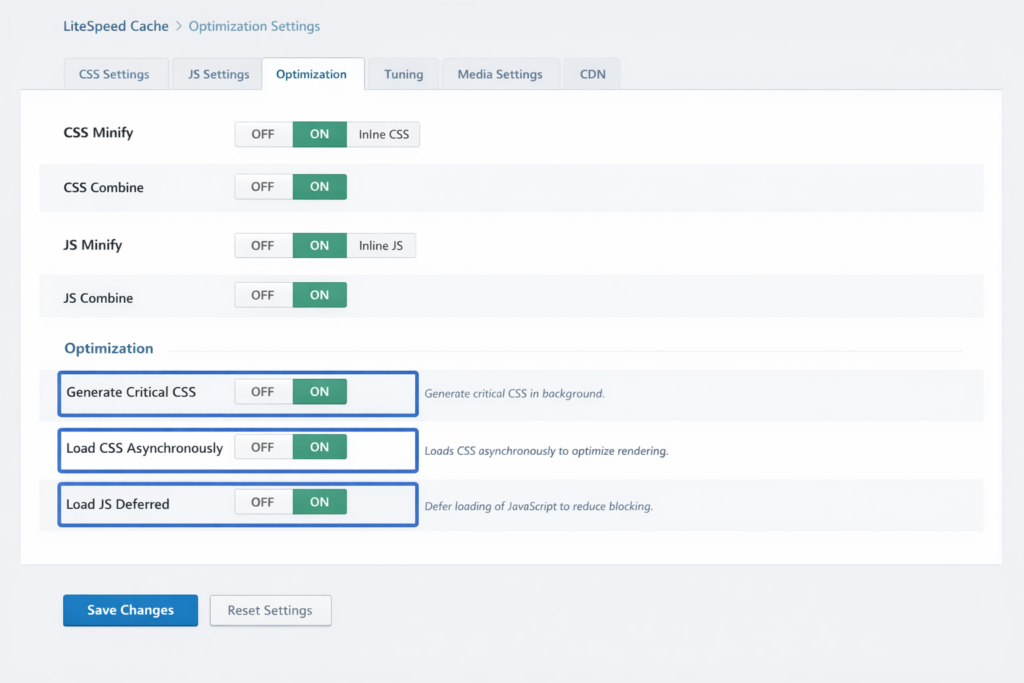
Render-blocking resources (CSS/JS) prevent page rendering until downloaded and executed.
Configuration:
Critical CSS explained: Critical CSS extracts styles needed for above-the-fold content, inlining them in HTML. Non-critical CSS loads asynchronously. Visitors see styled content immediately while full stylesheet loads in background.
CSS Combine warning: Combining CSS files can break themes using complex CSS loading patterns. If theme design breaks after enabling CSS Combine, disable it and use only minification.
Configuration:
Why not combine JavaScript? Modern JavaScript uses module systems and depends on load order. Combining JavaScript files frequently causes “undefined function” errors and broken functionality.
Safe approach:
WordPress databases accumulate unnecessary data over time, slowing queries.
Common database bloat:
Configuration:
Scheduling:
Safety: LiteSpeed Cache’s database cleaner is safe – it removes genuinely unnecessary data. For paranoid administrators, backup database before first cleanup.
Manual database optimization:
This defragments database tables, improving query performance.
Performance impact:
Browser caching stores static assets (images, CSS, JS) in visitor browsers, eliminating re-downloads on subsequent visits.
Configuration:
Why 1 year? Static assets rarely change. LiteSpeed Cache uses cache busting (appending version numbers to filenames) so updated files automatically invalidate old cache.
Example: style.css?ver=1.2.3 → Update to style.css?ver=1.2.4 forces fresh download.
Different WordPress configurations require different optimization approaches.
E-commerce sites balance aggressive caching with dynamic functionality (shopping cart, checkout).
Essential WooCommerce excludes:
/cart/
/checkout/
/my-account/
/addons/
add-to-cart
removed_item
Why exclude these?
WooCommerce + Guest Mode: Enable Guest Mode BUT exclude cart/checkout. Result:
Private cache for logged-in users:
Private cache creates user-specific cache versions, preventing user A from seeing user B’s cart.
Membership sites show different content to different user roles.
Configuration:
Why vary by role?
Alternative approach: Use ESI (Edge Side Includes) for user-specific content blocks. ESI allows caching page structure while dynamically inserting user-specific elements.
ESI configuration:
ESI requires LiteSpeed Enterprise (not available on OpenLiteSpeed).
WordPress multisite shares codebase across multiple sites but requires per-site cache.
Network-wide settings:
Per-site cache: LiteSpeed Cache automatically separates cache per site. Site A’s cache never serves to Site B visitors.
Shared object cache: All subsites share Redis object cache, reducing memory usage while maintaining performance.
Multisite consideration: Plugins must be network-activated for LiteSpeed Cache to function properly across all sites.
Optimization means nothing without measurement. Verify improvements through testing.
Testing procedure:
Target scores:
Common remaining issues:
GTmetrix provides detailed performance analysis.
Testing procedure:
Key GTmetrix metrics:
Waterfall analysis: Waterfall chart shows which resources load slowly. Common bottlenecks:
WebPageTest offers advanced testing including video capture.
Advanced testing:
First view vs Repeat view:
Good caching shows:
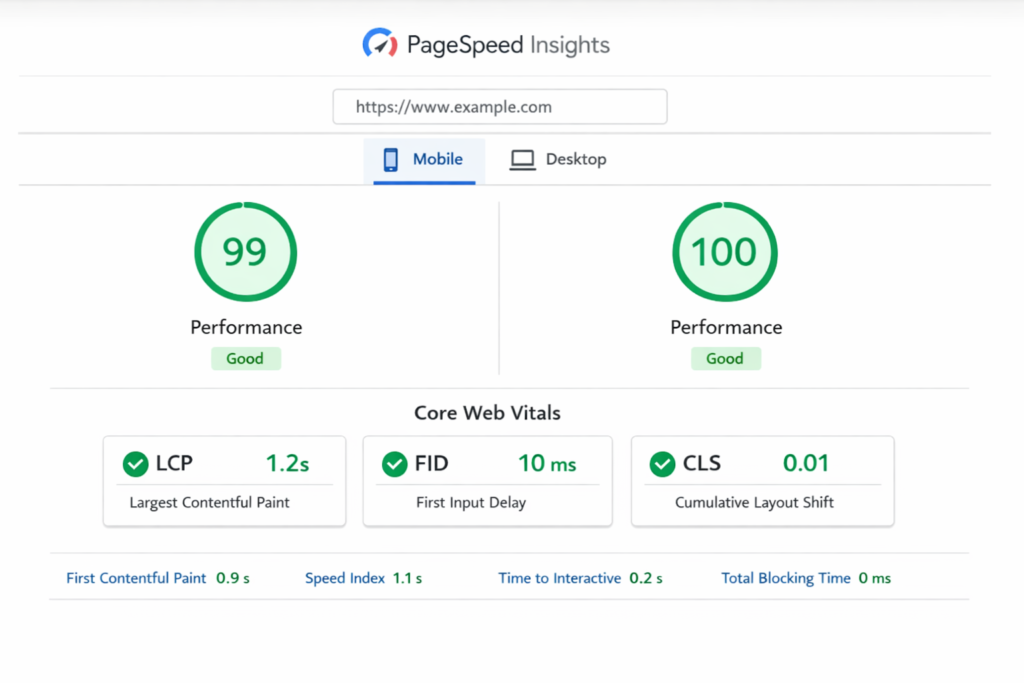
Google Search uses Core Web Vitals as ranking factors.
Three critical metrics:
Largest Contentful Paint (LCP):
First Input Delay (FID):
Cumulative Layout Shift (CLS):
Monitoring in Google Search Console:
LiteSpeed Cache impact on Core Web Vitals:
We’ve optimized LiteSpeed Cache extensively. Now let’s discuss why LiteSpeed Enterprise hosting provides advantages impossible to replicate elsewhere.
Traditional WordPress hosting uses Apache or Nginx web servers. These require plugin stacks for performance:
Apache/Nginx optimization stack:
Total annual cost: $300-500+
Performance overhead: Each plugin adds:
Running 5-6 optimization plugins partially negates their benefits through overhead.
WebHostMost’s LiteSpeed Enterprise infrastructure provides these features natively at server level:
Built-in at server level:
Real-world performance comparison:
Shared hosting (Apache + WP Rocket):
LiteSpeed Enterprise (WebHostMost):
Performance advantage: 4-6x faster time to first byte through architectural efficiency.
WebHostMost uses DirectAdmin control panel with LiteSpeed Enterprise integration.
Management advantages:
Technical support advantage: Support team has server access, enabling:
Traditional shared hosting support only access WordPress admin panel. Server-level issues require escalation and delays.
WebHostMost operates European data centers (Moldova-based) providing:
Low-latency access:
GDPR compliance:
Combined with LiteSpeed Cache:
🚀 Ready for WordPress hosting that delivers actual performance? Use promo code WELCOME_WHM for 20% off LiteSpeed Enterprise hosting with Redis, HTTP/3, and DirectAdmin included.
💪 Migrating from slow shared hosting? We provide free WordPress migration service with performance optimization during migration – typically achieving 3-5x speed improvements.
👉Explore managed WordPress hosting plans with LiteSpeed Enterprise and native optimization – or schedule a consultation to discuss your performance requirements.
Even properly configured caching encounters occasional issues. Here are solutions.
Symptom: You publish new post or update page, but old version still displays.
Cause: Cache hasn’t purged after update.
Solution:
Automatic purge configuration:
Common purge triggers:
Symptom: WooCommerce cart displays products from other users.
Cause: Guest Mode caching cart pages.
Solution:
/cart/
/checkout/
/my-account/
Verify excludes working: Open cart page, check LiteSpeed Cache widget in admin bar. Should show “Not Cached” status.
Symptom: Theme design breaks, elements misaligned, styles missing.
Cause: CSS Combine creates conflicts with theme’s CSS loading order.
Solution:
Alternative: Some themes include specific CSS that must load first. Use “CSS Excludes” to exclude problematic stylesheets from combining while combining others.
Symptom: Browser console shows “undefined function” or “$ is not defined” errors.
Cause: JavaScript deferral loading jQuery after other scripts expecting it.
Solution:
jquery
jQuery
jquery-core
Additional excludes: Some plugins require specific JavaScript libraries loaded immediately. Add to JS Deferred Excludes as needed.
Symptom: All images load immediately, causing slow initial page load.
Cause: Theme or plugin interfering with lazy loading, or images loading through JavaScript.
Solution:
Incompatible plugins: Some image slider plugins load images via JavaScript, bypassing lazy loading. This is expected behavior – sliders need images immediately available.
Symptom: Desktop PageSpeed scores 95-100, mobile scores 70-80.
Cause: Mobile-specific issues:
Solution:
For sites demanding absolute maximum performance, these advanced techniques push beyond 100 PageSpeed.
ESI allows caching entire pages while dynamically inserting user-specific elements.
Use cases:
Requirements:
Configuration:
Example: Product page cached for all users, but “Add to Cart” button shows cart count specific to each user.
HTTP/3 (built on QUIC) provides performance advantages over HTTP/2, especially for mobile.
LiteSpeed Enterprise advantages:
Verification:
No WordPress configuration required: LiteSpeed Enterprise handles HTTP/3 at server level. WordPress and LiteSpeed Cache plugin work identically.
LiteSpeed Cache integrates with Content Delivery Networks for global acceleration.
Recommended CDNs:
Configuration:
How CDN works with LiteSpeed Cache:
Performance impact:
Resource preloading tells browsers to download critical assets before HTML parsing completes.
Configuration:
//fonts.googleapis.com
//fonts.gstatic.com
//www.google-analytics.com
Preload fonts:
<link rel=”preload” href=”/fonts/custom-font.woff2″ as=”font” type=”font/woff2″ crossorigin>
Add via theme’s functions.php or LiteSpeed Cache HTML footer.
Preload critical CSS: LiteSpeed Cache’s Critical CSS feature automatically handles this through inline critical CSS and deferred full stylesheet.
Basic LiteSpeed Cache configuration takes 5-10 minutes – enable essential features like Object Cache (Redis), Guest Mode, image optimization, and CSS/JS minification. Advanced optimization including Critical CSS generation, database cleanup, and fine-tuning takes 30-60 minutes for first-time setup. After initial configuration, LiteSpeed Cache maintains performance automatically through scheduled cleanup and optimization tasks. Most sites achieve 90+ PageSpeed scores within 30 minutes of proper configuration, though achieving perfect 100/100 scores may require additional theme-specific optimization addressing unused CSS or third-party scripts LiteSpeed Cache cannot control.
No, never run multiple caching plugins simultaneously. LiteSpeed Cache conflicts with WP Rocket, W3 Total Cache, WP Super Cache, and similar caching solutions causing cache corruption, broken functionality, and paradoxically slower performance. Before activating LiteSpeed Cache, deactivate and uninstall all existing caching plugins. LiteSpeed Cache provides comprehensive caching functionality rendering other caching plugins unnecessary – it handles page cache, browser cache, object cache, database optimization, image optimization, and CSS/JS minification in single plugin. Running multiple caching plugins creates overhead that negates performance benefits while introducing conflicts and stability issues.
LiteSpeed Cache requires LiteSpeed web server (either OpenLiteSpeed or LiteSpeed Enterprise). If your hosting uses Apache or Nginx, LiteSpeed Cache plugin will install but won’t provide caching benefits – you’ll see “not running on LiteSpeed” warning in plugin dashboard. Some LiteSpeed Cache features like image optimization and CSS/JS minification work without LiteSpeed server, but core caching functionality requires proper server infrastructure. If your current hosting uses Apache/Nginx, consider migrating to LiteSpeed hosting like WebHostMost for full LiteSpeed Cache capabilities. Quality managed WordPress hosting should offer LiteSpeed Enterprise specifically because of these performance advantages.
Properly configured LiteSpeed Cache actually improves admin dashboard performance through Object Cache (Redis) reducing database queries. However, certain features like Critical CSS generation temporarily consume server resources during initial generation. Configuration recommendations for admin performance: disable cache for logged-in users (admin dashboard always serves fresh content), enable Object Cache to accelerate admin database queries, schedule intensive tasks like image optimization and database cleanup during low-traffic periods, and use staging environment for testing optimization changes before applying to production. Most administrators notice faster admin performance after enabling Object Cache alone.
LiteSpeed Cache automatically purges cache when content updates – publishing posts, updating pages, approving comments, or changing themes triggers automatic purge. Manual cache clearing is rarely necessary with proper configuration. However, clear cache manually when: installing new plugins affecting site-wide content, updating theme with layout changes, modifying CSS/JavaScript, or troubleshooting unexpected display issues. For routine maintenance, clearing cache once weekly or monthly provides peace of mind but isn’t technically necessary with automatic purge rules configured properly. Overly frequent manual cache clearing defeats caching purpose and reduces performance benefits.
Yes, LiteSpeed Cache optimizations benefit mobile PageSpeed particularly through image optimization (WebP conversion and lazy loading reduce mobile data usage), Critical CSS generation (eliminates render-blocking CSS on mobile connections), JavaScript deferral (prevents JavaScript blocking on slower mobile processors), and browser caching (reduces repeat downloads on mobile networks). Mobile-specific features include responsive placeholder generation for images and separate Critical CSS generation for mobile viewport. However, mobile PageSpeed scores are generally lower than desktop due to slower mobile connections and processors – achieving 90+ mobile score represents excellent performance even if desktop reaches 100.
Yes, LiteSpeed Cache dramatically improves WooCommerce performance while maintaining dynamic cart and checkout functionality. Essential configuration: exclude cart, checkout, and my-account pages from cache (these require user-specific data), enable private cache for logged-in users (creates user-specific cache versions), use Object Cache (Redis) to accelerate product queries, enable image optimization for product photos, and implement ESI (Edge Side Includes) for caching product pages while dynamically inserting cart widgets. Properly configured LiteSpeed Cache enables WooCommerce stores to handle 10x traffic compared to unoptimized setups. WooCommerce sites benefit most from Object Cache reducing repetitive product catalog queries.
LiteSpeed Cache operates at web server level, intercepting requests before reaching PHP/WordPress, while WP Rocket operates at application level requiring PHP/WordPress loading before checking cache. Performance difference: LiteSpeed Cache serves cached pages in 20-50ms, WP Rocket serves in 200-300ms due to PHP involvement. LiteSpeed Cache requires LiteSpeed web server (OpenLiteSpeed or Enterprise); WP Rocket works on any hosting but cannot achieve same performance on Apache/Nginx. Cost: LiteSpeed Cache is free; WP Rocket costs $49-249/year. Feature comparison: both provide CSS/JS optimization, image optimization, and database cleanup, but LiteSpeed Cache includes native Object Cache and HTTP/3 support. Conclusion: if hosting offers LiteSpeed, use LiteSpeed Cache. If hosting uses Apache/Nginx, WP Rocket provides best available optimization.
And don’t forget to explore our LiteSpeed Enterprise hosting plans – because achieving 100/100 PageSpeed starts with infrastructure designed for performance, not generic shared hosting retrofitted with plugin workarounds.Have you seen our other articles?